Showing posts with label pom-poms. Show all posts

Sunday, December 2, 2007

Buttery Toasted Patchwork Pillow


I'm having trouble coming up with new words to describe these yellow and brown wool pillows - toasty is first and foremost on my mind when I look at them. I'm working my way through two stacks of felted wool I bought from the City Quilter. They have quite a nice selection - I actually bought a teal/blue spectrum stack as well, but I I've been holding back from starting to work on it, as I feel like I'm on a roll with the yellows and browns.


I designed this pillow while on the subway, but had to improvise once I was actually executing it. These wools are bought in stacks containing beautiful but slighly mishapen pieces - it's not like I have even full fat quarters of any of these, so they almost force you to do patchwork.

I had hardly any light yellow fabric yet, and a lot of brown, so the rows containing yellow pieces ended up being 2" tall while the one containing solely brown pieces were 3". It's very hard to see this, but the corner pieces are a slightly different yellow than the others, again, improvised out of necessity due to not having enough of either yellow color.


I was also planning on having the rows and colums of brown (except the 4 dark pieces) be the same shade of brown, but I discovered that was not to be either. However, I enjoyed the troubleshooting process and was relieved that ultimately I was able to come up with a combination that worked - both in sticking as closely as possible to my original vision, and in having enough fabric to execute it.


These wool projects take longer than the cotton ones, because pinning and pressing are absolutely key. Pinning is just about the same in difficulty (show above) but the pressing of the wool seam allowances is a bit challenging. In order to prevent bulking up the patchwork, I pressed open the seams.
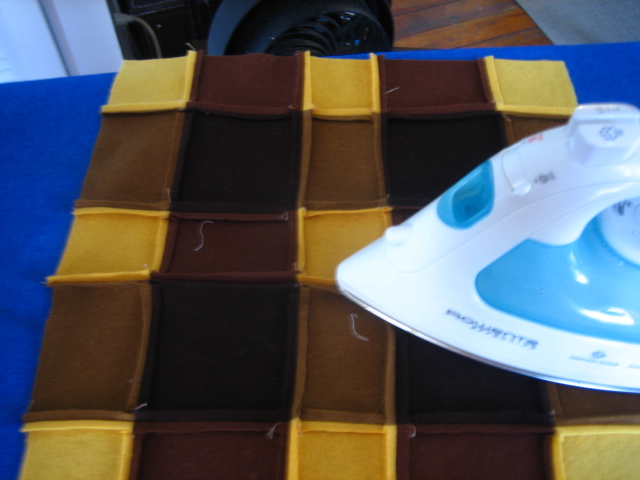


You really have to presss the hell out of it, and put some elbow grease into it to make it work.
Overall, I'm glad with the results - it lays flatter than my previous wool patchwork project.


The next step was that I hand embroidered the contrast stitching. It's fun to do this with the wool fabric. First of all, I love embroidery. And you don't have to use an embroidery hoop, because the fabric is nice and thick and a little stiff.


And here's a picture of the final product again!

A

Tuesday, November 13, 2007

Toasty Wool Pillow for Icebat


I just completed my second wool pillow. I made it for Icebat. Like the last one, it was inspired by the Japanese book "wool patchwork: warm quilt for the home."


I purchased these packs of felted wool from The City Quilter. They are from Wild Thymes Pattern Co., and they look quite appealing in their little stacks.


I was inspired by this lovely picture from the book. I love how their version is both wooly and lemony at the same time.


They have some instructions in Japanese in the back, but I could figure out what I wanted to do by looking at the photo, so I didn't refer to them. Here's my quick sketch for my version of the project. I carry around a little notebook of graph paper for this purpose - sometimes I work things out on the subway. This is one of the simplest designs ever - it's almost embarrassing to put it here:


I'm finding using the cotton fill pretty liberating, because when I use it I'm not married to any particular pillow size. I decided to make the pillow 12" x 12" because I thought it would be cute.

I played with the squares until I got something I liked:


I don't know if you can see it here, but there is a nice herringbone mixed in there. These little pieces of wool are rather expensive, and I caught myself obsessing at a brunch this weekend over my friend's vintage pants. I can see myself going out and trolling the flea markets for some old clothing - because if I'm going to continue with the wool pillow making I need to find a cheaper way to do it.


The wool was considerably more difficult to iron than the cotton quilt fabric I'm used to. I normally iron both the seam allowances in one direction, but with the wool, I carefully pressed the seam allowances open so that they wouldn't be too thick. I really had to lean on the iron to get those seams to stay down!

Then I took a bowl of pom-poms, sat down with my favorite cup of tea, and set upon the task of sewing those cute little pom-poms onto the pillow top. This is a good activity to do while watching TV.


Cute as a button! I like how Icebat looks both bashful and proud in this picture - I intentionally chose the pom-poms to match him. Ta-da!

Wednesday, August 8, 2007

Pincushions complete!


I finally got my cotton fill from purl. The bag is huge! I don't know how I'll use all this stuff.


I must say it was very enjoyable to work with - a very different tactile experience than patchwork and embroidery.


Like a pita...


Finally! I can stop using my balled up socks as pincushions. I even put in some nice unused pins to celebrate.

Thursday, August 2, 2007

Pincushions


For quite some time I have needed some pincushions. Why? I think this photo says it all:


My mother had given me a nice, traditional pincushion - the kind that looks like a giant strawberry. But I find the filling too hard - when I'm sticking pins into it in the middle of sewing, it's too resistant. Somehow I came up with this McGyver solution of the sweat sock. But obviously it's yucky.

I've been wanting a nice(r) pincushion for some time, and have spent many hours looking at the delightful concoctions people have come up with on Etsy. They are seriously delightful, but I have two cartons of fabric sitting there, mocking me, saying come on, can't you take this on?


So, I have been sketching out some potential designs this week - all very cute and whatnot, but ultimately, I decided to be very spontaneous and make use of my scrap bag. I only started keeping a scrap bag recently, when I started reading up on string quilting - this is a good tutorial.

Anyhow, I only had 45 minutes to cut and sew these up, so I decided to use solely my scraps. First I cut them - intentionally not entirely straight - and sewed them all together, not ironing between pieces. Then I ironed the whole mess, and squared it off to a 8x5 rectangle.


It wasn't my original intention to make two, but I had prepared the perfect size to cut it in half.


I chain stitched the fronts to save time.


This is how far I got in less than an hour - not bad! They are sewn three quarters around, and are just waiting for their filling and trim.


I am attaching these cute pop-poms from M&J Trimming.


Now they just need their filling and final stitches!