Sunday, December 2, 2007

Buttery Toasted Patchwork Pillow


I'm having trouble coming up with new words to describe these yellow and brown wool pillows - toasty is first and foremost on my mind when I look at them. I'm working my way through two stacks of felted wool I bought from the City Quilter. They have quite a nice selection - I actually bought a teal/blue spectrum stack as well, but I I've been holding back from starting to work on it, as I feel like I'm on a roll with the yellows and browns.


I designed this pillow while on the subway, but had to improvise once I was actually executing it. These wools are bought in stacks containing beautiful but slighly mishapen pieces - it's not like I have even full fat quarters of any of these, so they almost force you to do patchwork.

I had hardly any light yellow fabric yet, and a lot of brown, so the rows containing yellow pieces ended up being 2" tall while the one containing solely brown pieces were 3". It's very hard to see this, but the corner pieces are a slightly different yellow than the others, again, improvised out of necessity due to not having enough of either yellow color.


I was also planning on having the rows and colums of brown (except the 4 dark pieces) be the same shade of brown, but I discovered that was not to be either. However, I enjoyed the troubleshooting process and was relieved that ultimately I was able to come up with a combination that worked - both in sticking as closely as possible to my original vision, and in having enough fabric to execute it.


These wool projects take longer than the cotton ones, because pinning and pressing are absolutely key. Pinning is just about the same in difficulty (show above) but the pressing of the wool seam allowances is a bit challenging. In order to prevent bulking up the patchwork, I pressed open the seams.


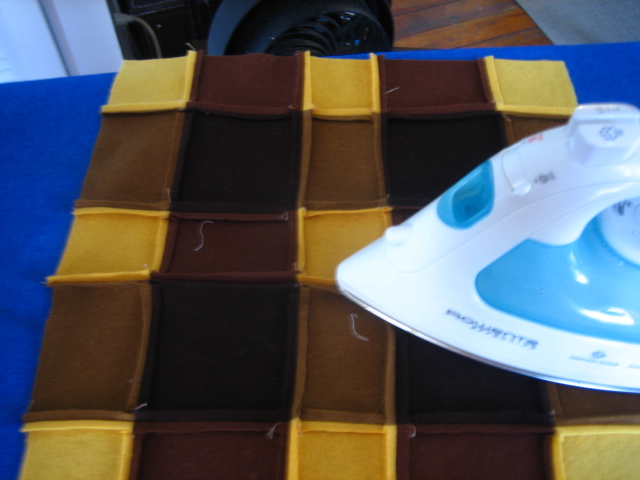
You really have to presss the hell out of it, and put some elbow grease into it to make it work.
Overall, I'm glad with the results - it lays flatter than my previous wool patchwork project.


The next step was that I hand embroidered the contrast stitching. It's fun to do this with the wool fabric. First of all, I love embroidery. And you don't have to use an embroidery hoop, because the fabric is nice and thick and a little stiff.


And here's a picture of the final product again!

A

Monday, November 26, 2007

Purple Pillow for Michele


I made this purple pillow for one of my best friend's new apartment - actually I made two identical ones for her. I used the same pattern as I did for the bunny pillow and the Joel Dewberry faux bois/birds pillow.

The flowered fabric is a Japanese imported fabric I bought from purl soho, and the striped fabric is from the American Jane series from Moda. I think it's an ideal stripy fabric, and it comes in lots of nice colors that have the feeling of being just slightly faded.

You may notice that I'm trying to make a leap forward here in terms of setting "set dressing" my photos. The chicken and I enjoyed playing with props and creating a "view in a room" feeling (like in westelm.com) though there's a lot more I'd like to learn about my camera in terms of light and clarity.

Wednesday, November 21, 2007

French Knot/Stacked Coin Pillow - First Etsy Post!


After many months of putting it off, I've finally opened my Etsy store!! You can check it out here:

http://swallowdesigns.etsy.com

... and this project is the first item I've posted there!

This is a fairly unique project for me, because I did it pretty much on the fly - I didn't sketch it out on graph paper beforehand. In fact, what I really wanted to do was something more liked a traditional "stacked coin" design. I'm having trouble finding a definition of what this means, but as far as I can tell it's essentially a design that incorporates strips of stacked patches, framed in neutral sashing.

I wanted to show you some examples on Flickr but got these results instead.

This quilt from Miss MeShell was really the inspiration - I love how she combined a deliciously simple linen with citrusy fabrics. She blogged it here and it's well worth checking it out!

My project veered off this plan, as you'll see soon...


I started with a pile of strips from my scrap box. I sorted them out for the blues, oranges, tans, and browns - which wasn't really hard because most of my projects lately have been in those spectrums. It was more a matter of weeding out the odd green scrap.


This part of the process went super-quick - I actually placed the sewing machine on my ironing board and did the whole thing standing up. This saved a lot of time. Plus it made it easier to watch TV. Can you tell I like to multitask?


I ironed each strip just before sewing it to the previous one, but I didn't iron the whole patched piece until I was done. Enjoyably spontanous compared with some of my more laborious projects, and certainly efficient.

When I finished preparing the large strip patch, I cut it into 4 pieces. However, after some thought, I ditched the traditional vertical parallel lines of stacked coins. I didn't have any linen, and it just didn't look as cool on the dark brown background.


So, I decided to use them as a frame for one of my French knots projects. I made this particular one a while ago, and they were inspired by the Connect the Dots tutorial from the purl bee, one of my favorite blogs from my good friends at purl soho. And by good friends I mean advisors/teachers/dealers of irresistable fabrics!


The back is an envelope flap, using the remaining "stack coined" (if I can call them that) strips:


Remember folks, this item is actually live and on sale on my store on Etsy! Why now? How did I finally set it up? Well, I ran out of room for my pillows. I'd love to keep them all, but there's only so much room I have on my bed and couch. The good thing is, it frees me up to use different colors - ones that don't match my lamp, sheets, and other accessories. I'm looking forward to seeing how that frees up my creative process.

Thursday, November 15, 2007

Shake it Up!


Okay, I just received a challenge from an anonymous reader. In case you missed it, here it is from my last post:

Anonymous said...

icebat sure does look handsome next to your woolly pillow and vice versa. you seem like such a nice, placid sort of gal. but whatever happened to your embroidery "with an edge"? let's see more of that!

Ouch! Nice, maybe - but placid? I can't take it! So here it is. I've been sitting on this since I finished it this summer, but now I'm breaking it out.

Here's how it works:

It starts with a photo, that I bought from a Chelsea flea market - one that actually still exists (as of this writing):


Believe it or not, this project has effectively been a few years on the making. I first made a pen and ink drawing based on it:


I think the lady on the right looks a little like Karen from Will and Grace. That wasn't intentional!

This is one of my favorite drawings I've ever done. It's definitely influenced by underground cartoon art, such as Charles Burns, the Hernandez Brothers, and one of my all-time favorites, Dan Clowes, circa Like a Velvet Glove Cast in Iron era.

So, this summer, I picked it up and tried to turn it into embroidery. I traced the drawing (not the original photo) onto fabric using standard carbon paper. Long live the small stationary store!

Unfortunately, my first try didn't work out so well. I don't even have that anymore to show you. This is the second try, which is horrible, so you can just imagine how bad the first one was:


It was really hard for me to let this go, because the above represents hours and hours of embroidery. Oh well! I got it right the third time - but I did do several different takes of color combinations on the nipples before I was satisfied.


I tried to stick to a limited color palette, almost like one might do for a screen print.


I love and hate doing hair. It's incredibly time consuming - but what can you do? Hair is important!


I'm very happy with how the necklace on "Karen" turned out. The blue beads were made by doing a pretty standard back stitch in a circle, and then placing a French knot in the middle.

This was surprisingly hard to photograph! It looks a lot better in person - in the pic, the lady on the left looks like she's giving you the evil eye! But it's an optical illusion.

Tuesday, November 13, 2007

Toasty Wool Pillow for Icebat


I just completed my second wool pillow. I made it for Icebat. Like the last one, it was inspired by the Japanese book "wool patchwork: warm quilt for the home."


I purchased these packs of felted wool from The City Quilter. They are from Wild Thymes Pattern Co., and they look quite appealing in their little stacks.


I was inspired by this lovely picture from the book. I love how their version is both wooly and lemony at the same time.


They have some instructions in Japanese in the back, but I could figure out what I wanted to do by looking at the photo, so I didn't refer to them. Here's my quick sketch for my version of the project. I carry around a little notebook of graph paper for this purpose - sometimes I work things out on the subway. This is one of the simplest designs ever - it's almost embarrassing to put it here:


I'm finding using the cotton fill pretty liberating, because when I use it I'm not married to any particular pillow size. I decided to make the pillow 12" x 12" because I thought it would be cute.

I played with the squares until I got something I liked:


I don't know if you can see it here, but there is a nice herringbone mixed in there. These little pieces of wool are rather expensive, and I caught myself obsessing at a brunch this weekend over my friend's vintage pants. I can see myself going out and trolling the flea markets for some old clothing - because if I'm going to continue with the wool pillow making I need to find a cheaper way to do it.


The wool was considerably more difficult to iron than the cotton quilt fabric I'm used to. I normally iron both the seam allowances in one direction, but with the wool, I carefully pressed the seam allowances open so that they wouldn't be too thick. I really had to lean on the iron to get those seams to stay down!

Then I took a bowl of pom-poms, sat down with my favorite cup of tea, and set upon the task of sewing those cute little pom-poms onto the pillow top. This is a good activity to do while watching TV.


Cute as a button! I like how Icebat looks both bashful and proud in this picture - I intentionally chose the pom-poms to match him. Ta-da!

Friday, November 2, 2007

Toasty Yellow Wool Pillow


Here's my latest pillow. Yay!


I bought this book "wool patchwork: warm quilt for the home" in the Kinokuniya bookstore in Japantown in San Francisco. I'd never seen it before, and I haven't seen it since. I couldn't find it on Amazon - but you could special order it from your local bookstore by ISBN 4-579-10894-9.


Above is a photo from this lovely book - there are many tempting projects in here. I based my pillow on the top one on that pile.


I was planning to do an envelope back like I usually make, but the felting on the wool made the pieces uneven (see the right side above), and when I squared them off, the patchwork top couldn't fit a standard pillow. Well, I have lots of leftover cotton fill from my tiny pincushion project:


I hand sewed a running stitch going through the seam allowance on the other side, as the book instructions illustrated:


Looks real nice!


I made the back out of a fabric from Denyse Schmidt's Katie Jump Rope line.


We love pillows!

Monday, October 22, 2007

Bunny Pillow - complete!


I finished the bunny pillow I started last week. I really think this is one of my favorite patterns so far. I have sketched out how I might execute it as a quilt. I'm feeling very enthusiastic about this - though I've never quilted anything but a small piece of muslin. However, I'm taking a couple of quilting classes at the City Quilter next month - two couple hour workshops - machine quilting and freestyle machine quilting.

I have a few good books on quilting - but I just haven't been able to take the plunge into actually doing it. I'm even intimidated by "stitch in the ditch." I know I should try it on something small like one of my pillow tops, but I hate the idea that I could ruin my hard work on the patchwork by amateurish quilting.


Here's a side view of the pillow - I love the combo of the colors and patterns. I'm sticking with this tangy navy and orange theme for a lot of my patchwork pillow variations. It hasn't been done in recent CB2 and West Elm and the other catalogues or magazines I get, so it feels fresh to me.


Here's one more beauty shot!

Fabric credits:
Orange stripes - from the American Jane series
Bunnies - Japanese import
Border/flowers - Denyse Schmidt Katie Jump Rope series

Sunday, October 21, 2007

Joel Dewberry Pillow Set


I was very excited by how my bunny pillow worked out. I was eager to reuse this particular interlocking grid pattern from my Japanese Quilt Blocks book. Compared to the other patterns I'd tried from the book, this was probably the easiest/least time consuming, and I like it because it conveys the same complexity as the others visually, but with less effort. That is, I think only a quilter would realize this is a less complex pillow to complete than the others.

I decided to go back to this fabric that I already had in my stash, to make a companion pillow for the lumbar pillow and coasters I had made a couple of months ago.


Unlike the bunny fabric, however, the Sparrows (in Almond) fabric from the Joel Dewberry Aviary line is what's considered a "fussy" fabric - which in this context means a fabric that you have to cut and sew carefully to make select parts of the pattern appear where you want to them to. I have only used a fussy fabric once before, which was a large print Heather Bailey fabric for my "Spring Pillow for Fall," and in both of these cases, it definitely added planning and cutting time to the project.


I laid out the project in advance - I did want that middle bird to be off center, but for some reason didn't realize that it would be cut off because of seam allowance. Ah well, grist for the mill - I learn something new on every project.


I finished off the pillow using another faux bois fabric from Joel Dewberry - Woodgrain in Orange. I really like how cartoony the Chocolate version of the wood grain looks applied in this particular quilt block. I like the orange version too, but the high contrast in the chocolate makes the woodgrain easier to "read" - even across the room.


Here's one last shot for the hell of it!