Showing posts with label Fabric - Denyse Schmidt. Show all posts

Sunday, December 2, 2007

Buttery Toasted Patchwork Pillow


I'm having trouble coming up with new words to describe these yellow and brown wool pillows - toasty is first and foremost on my mind when I look at them. I'm working my way through two stacks of felted wool I bought from the City Quilter. They have quite a nice selection - I actually bought a teal/blue spectrum stack as well, but I I've been holding back from starting to work on it, as I feel like I'm on a roll with the yellows and browns.


I designed this pillow while on the subway, but had to improvise once I was actually executing it. These wools are bought in stacks containing beautiful but slighly mishapen pieces - it's not like I have even full fat quarters of any of these, so they almost force you to do patchwork.

I had hardly any light yellow fabric yet, and a lot of brown, so the rows containing yellow pieces ended up being 2" tall while the one containing solely brown pieces were 3". It's very hard to see this, but the corner pieces are a slightly different yellow than the others, again, improvised out of necessity due to not having enough of either yellow color.


I was also planning on having the rows and colums of brown (except the 4 dark pieces) be the same shade of brown, but I discovered that was not to be either. However, I enjoyed the troubleshooting process and was relieved that ultimately I was able to come up with a combination that worked - both in sticking as closely as possible to my original vision, and in having enough fabric to execute it.


These wool projects take longer than the cotton ones, because pinning and pressing are absolutely key. Pinning is just about the same in difficulty (show above) but the pressing of the wool seam allowances is a bit challenging. In order to prevent bulking up the patchwork, I pressed open the seams.
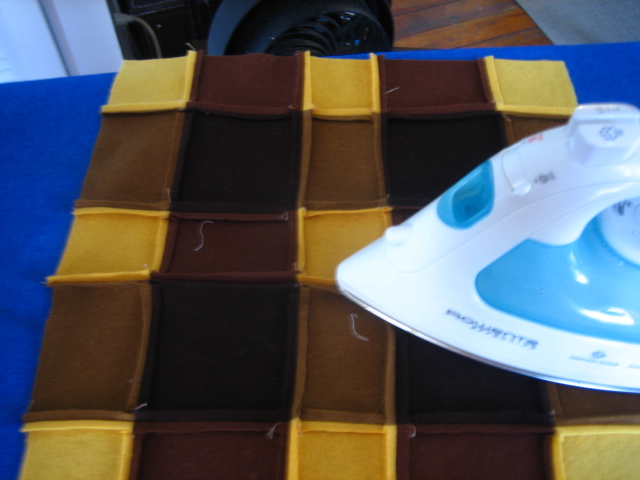


You really have to presss the hell out of it, and put some elbow grease into it to make it work.
Overall, I'm glad with the results - it lays flatter than my previous wool patchwork project.


The next step was that I hand embroidered the contrast stitching. It's fun to do this with the wool fabric. First of all, I love embroidery. And you don't have to use an embroidery hoop, because the fabric is nice and thick and a little stiff.


And here's a picture of the final product again!

A

Wednesday, November 21, 2007

French Knot/Stacked Coin Pillow - First Etsy Post!


After many months of putting it off, I've finally opened my Etsy store!! You can check it out here:

http://swallowdesigns.etsy.com

... and this project is the first item I've posted there!

This is a fairly unique project for me, because I did it pretty much on the fly - I didn't sketch it out on graph paper beforehand. In fact, what I really wanted to do was something more liked a traditional "stacked coin" design. I'm having trouble finding a definition of what this means, but as far as I can tell it's essentially a design that incorporates strips of stacked patches, framed in neutral sashing.

I wanted to show you some examples on Flickr but got these results instead.

This quilt from Miss MeShell was really the inspiration - I love how she combined a deliciously simple linen with citrusy fabrics. She blogged it here and it's well worth checking it out!

My project veered off this plan, as you'll see soon...


I started with a pile of strips from my scrap box. I sorted them out for the blues, oranges, tans, and browns - which wasn't really hard because most of my projects lately have been in those spectrums. It was more a matter of weeding out the odd green scrap.


This part of the process went super-quick - I actually placed the sewing machine on my ironing board and did the whole thing standing up. This saved a lot of time. Plus it made it easier to watch TV. Can you tell I like to multitask?


I ironed each strip just before sewing it to the previous one, but I didn't iron the whole patched piece until I was done. Enjoyably spontanous compared with some of my more laborious projects, and certainly efficient.

When I finished preparing the large strip patch, I cut it into 4 pieces. However, after some thought, I ditched the traditional vertical parallel lines of stacked coins. I didn't have any linen, and it just didn't look as cool on the dark brown background.


So, I decided to use them as a frame for one of my French knots projects. I made this particular one a while ago, and they were inspired by the Connect the Dots tutorial from the purl bee, one of my favorite blogs from my good friends at purl soho. And by good friends I mean advisors/teachers/dealers of irresistable fabrics!


The back is an envelope flap, using the remaining "stack coined" (if I can call them that) strips:


Remember folks, this item is actually live and on sale on my store on Etsy! Why now? How did I finally set it up? Well, I ran out of room for my pillows. I'd love to keep them all, but there's only so much room I have on my bed and couch. The good thing is, it frees me up to use different colors - ones that don't match my lamp, sheets, and other accessories. I'm looking forward to seeing how that frees up my creative process.

Friday, November 2, 2007

Toasty Yellow Wool Pillow


Here's my latest pillow. Yay!


I bought this book "wool patchwork: warm quilt for the home" in the Kinokuniya bookstore in Japantown in San Francisco. I'd never seen it before, and I haven't seen it since. I couldn't find it on Amazon - but you could special order it from your local bookstore by ISBN 4-579-10894-9.


Above is a photo from this lovely book - there are many tempting projects in here. I based my pillow on the top one on that pile.


I was planning to do an envelope back like I usually make, but the felting on the wool made the pieces uneven (see the right side above), and when I squared them off, the patchwork top couldn't fit a standard pillow. Well, I have lots of leftover cotton fill from my tiny pincushion project:


I hand sewed a running stitch going through the seam allowance on the other side, as the book instructions illustrated:


Looks real nice!


I made the back out of a fabric from Denyse Schmidt's Katie Jump Rope line.


We love pillows!

Monday, October 22, 2007

Bunny Pillow - complete!


I finished the bunny pillow I started last week. I really think this is one of my favorite patterns so far. I have sketched out how I might execute it as a quilt. I'm feeling very enthusiastic about this - though I've never quilted anything but a small piece of muslin. However, I'm taking a couple of quilting classes at the City Quilter next month - two couple hour workshops - machine quilting and freestyle machine quilting.

I have a few good books on quilting - but I just haven't been able to take the plunge into actually doing it. I'm even intimidated by "stitch in the ditch." I know I should try it on something small like one of my pillow tops, but I hate the idea that I could ruin my hard work on the patchwork by amateurish quilting.


Here's a side view of the pillow - I love the combo of the colors and patterns. I'm sticking with this tangy navy and orange theme for a lot of my patchwork pillow variations. It hasn't been done in recent CB2 and West Elm and the other catalogues or magazines I get, so it feels fresh to me.


Here's one more beauty shot!

Fabric credits:
Orange stripes - from the American Jane series
Bunnies - Japanese import
Border/flowers - Denyse Schmidt Katie Jump Rope series

Wednesday, October 17, 2007

bunny pillow - preview


I don't typically publish works-in-progress to my blog or to my flickr photostream, but I'm so darned excited by this pillow top I just can't help it. I'm also a little tired of seeing my previous project at the top of the page!


I've been working my way through the book Japanese Quilt Blocks to Mix and Match, and I've had my eye on the above pattern for some time. I like they way the stripes cross over each other and give the appearance of interlocking, and I've been on the look out for an appropriate striped fabric to try it out with.

The name of the pattern is Yosegi kawari royagoshi - translated in the book as "Prison grille check variation." I am trying to ignore the unfortunate jail reference, and think of this more as a decorative window onto a field of bunnies!


I stumbled upon this Japanese bunny fabric in Purl the other day, and I quickly purchased it. Who can resist bunnies? I really like the simplicity of these, especially against the unfussy background. They also reminded me of some little bags I picked up when I was in Kyoto a couple of years ago, so there's sort of layers of built in nostalgia in this fabric for me - good memories of my pet rabbit Hazel from childhood, and of one of my favorite trips in adulthood.


Here's the finished pillow-top. Weird angle, I know! The orange stripes are from the Peas and Carrots series - I've enjoyed some of the other fabrics from this series - for instance, the kind of cartooney ovals I used on my South Park pillow. The border is from Denyse Schmidt's Katie Jump Rope series.

More to come when I've completed the back of the pillow!

Friday, September 14, 2007

Heather Bailey Freshcut Pillow


I whipped up this pillow this morning before work because I was sick and tired of the strict brown and green color scheme I had established in this bedroom. I must say this pillow really helps!

As I said in my last post, I don't typically use pink in my designs, embroidery, decor - anywhere - but I do find it slowly creeping into my work. I must say it's fun to have a brand new color to my palette.

The flower pattern is from Heather Bailey's beautiful and unusual Freshcut series. It actually looks very similar to the wallpaper pattern and colors I had on my bedroom walls growing up in the 70s.


This is the back - but it could certainly be used as the front as well!

More fabric credits: the left is also from the Heather Bailey Freshcut series, the fabric on the right is from Amy Butler's Belle series (Okra Seeds), and the blue stripe is from Denyse Schmidt's Flea Market Fancy series - and it's one of my favorite accent fabrics.

Friday, August 17, 2007

Mmmm... More Japanese Quilt Block Pillows


My latest project is another one from the book Japanese Quilt Blocks to Mix and Match.

I had purchased some blue fabric last week, and constructed block #5, otherwise known as Kurume kasuri igeta.

I was very happy with the results, and have been plotting since then about what block to do next. I settled on the very next one, #6 - Yamato kasuri igeta (Yamato well curb).


I am truly attracted to the simplicity of the designs and colors laid out in the book, but I like to add just a little bit of pattern to add more texture and fun to the look.

First I pieced 5 strips of fabric together...


... and then cut them perpendicularly to create the 1st, 3rd, and 5th columns below.


I did this as a "time saving" method, but it left me with a lot of extra sewn fabric that I couldn't use for this project. Hopefully I'll be able to apply it another one.


I chain stitched the remaining squares for columns 2 and 4:


After I sewed the columns together, I added the outside strips. I adapted the "recipe" in the book from a 9" block to a 16" block, so there was some slight redesign involved, which I plotted out on a small piece of graph paper before starting.

The most major change was adding this colorful 1 1/2" border. Visually, I like to think it looks like the binding on a quilt.


So, here's the two blocks as they appear in the book:


And here they are transformed into pillows!


I was very pleased with the results and took many glamour shots:


As always, I couldn't resist putting some quirkiness into the back:


I like how splashes of color peek out when you pass them from diffferent angles:


Look who's happy for new pillows!!


Tuesday, August 7, 2007

Blue for you


I just completed my second project from Japanese Quilt Blocks to Mix and Match. The first one I did was for my dad.

This time I tackled block #5, otherwise known as Kurume kasuri igeta.


I have to admit, I was bad. I a) bought fabric yesterday when I was supposed to be adhering to my self-imposed fabric-buying freeze and b) used the fabric before washing it. Sigh. I just couldn't wait. That's okay, I just won't wash it. Ever.

Here are the culprits:


Who could resist these charmers?

These actually represent some of my favorite fabric patterns, but these are the first time I have played with these particular color variations. Again, dark blue is a new thing for me.

Before I get started with cutting and sewing, I translate and re-do the pattern a little. The blocks in the book are set up to be 9" squares - perfect for a quilt, or a small, fill-stuffed pillow, I suppose. When I did my dad's pillow, I simply "doubled the recipe," and made an 18" pillow. However, I greatly prefer 16" pillows for myself. They're just, well, cuter.


This was a little more complicated than just doubling all of the called-for sizes; instead, I decided to make some variations, including adding some kind of "binding"- looking border with the brown/blue flowered fabric, which is from Denise Schmidt's Katie Jump Rope series.

The pattern in the book called for pre-cutting every piece, but I like timesaving techniques, such as this. Do you really want to cut 15 individual squares and then sew them together? No.


Completing the "border":


The top is done!


And here's some detailed shots of the sides and back. I really like to see those white on blue polka-dots peaking out.


I couldn't resist adding a splash of color! That orange fabric is also from Denyse Schmidt's Katie Jump Rope series.


Et voila!